Will post a pic as soon as the preamp board is complete (or close to it).
Authentic JTM 45/100 build diary. Clips added.
Moderator: VelvetGeorge
-
VintageCharlie

- Senior Member
- Posts: 692
- Joined: Tue Sep 29, 2009 12:05 am
- Just the numbers in order: 7
Re: Authentic JTM 45/100 build diary
Yes, the tech who is building it is populating the boards and the preamp board should be ready soon - that's probably the most tedious and time consuming work. I made his life a living hell by pestering him with LOTS of technically redundant details, but he endured heroically. Meanwhile he also was/is trying to talk some reason into my quest for authenticity in regard to some choices, which is also hard work 
Will post a pic as soon as the preamp board is complete (or close to it).
Will post a pic as soon as the preamp board is complete (or close to it).
-
Xplorer

- Senior Member
- Posts: 2472
- Joined: Sun Apr 19, 2009 5:27 pm
- Just the numbers in order: 7
-
VintageCharlie
- Senior Member
- Posts: 692
- Joined: Tue Sep 29, 2009 12:05 am
- Just the numbers in order: 7
Re: Authentic JTM 45/100 build diary
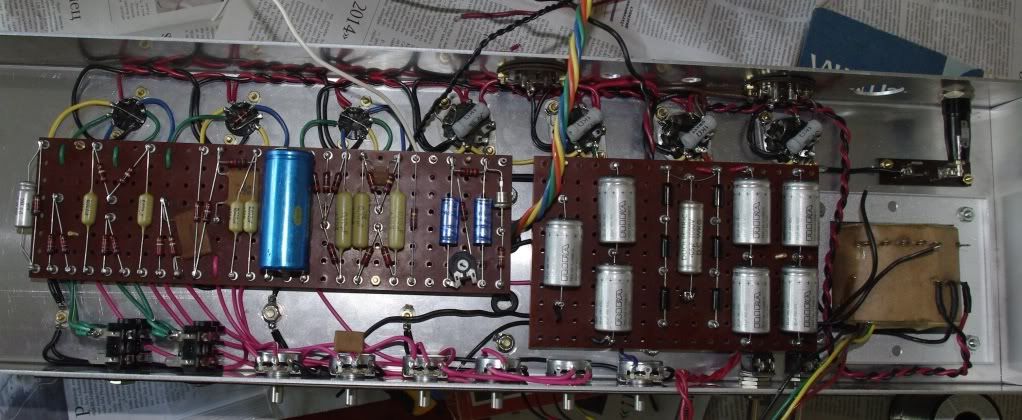
Here are the almost 100% complete boards (see attachment).
- Attachments
-
- preamp.jpg (166.13 KiB) Viewed 3355 times
-
- preamp board.jpg (184.35 KiB) Viewed 3355 times
-
- filter board.jpg (285.54 KiB) Viewed 3355 times
-
VintageCharlie
- Senior Member
- Posts: 692
- Joined: Tue Sep 29, 2009 12:05 am
- Just the numbers in order: 7
Re: Authentic JTM 45/100 build diary
Now it's turn for the transformers to travel into the chassis. This is a temporary placement of the trannies in the chassis (see attachment) - we'd need some tips how to route the wires.
It's all Marstran 45/100 transformers 1202-84 OT and 1204-43 PT and the 3h Choke (1999). The 490v tap on the PT will be used.
It would be a great help if someone who used this exact same iron could post a build progress pic, where it is visible how they have to be placed and which wires should best be routed through which of the 3 holes for the OT wires.
For now it seems to me that this type of mounting would be correct (when looking at the Marstran wiring diagrams). One could use the 3rd OT chassis hole to run 2 of the four wires through there, though i don't know if it should be done like that - maybe running them through one hole is better?
Thanks and regards,
VintageCharlie
- Attachments
-
- transformers 1.jpg (281.94 KiB) Viewed 3351 times
-
- transformers.jpg (284.94 KiB) Viewed 3354 times
Last edited by VintageCharlie on Fri Aug 19, 2011 8:36 am, edited 3 times in total.
-
VintageCharlie
- Senior Member
- Posts: 692
- Joined: Tue Sep 29, 2009 12:05 am
- Just the numbers in order: 7
OT, PT wiring diagrams
Ok, i found the PT and OT wiring diagrams on Brian's site.
- Attachments
-
- 1204-43.gif (4.68 KiB) Viewed 3377 times
-
- Marstran120284.jpg (12.37 KiB) Viewed 3378 times
-
VintageCharlie
- Senior Member
- Posts: 692
- Joined: Tue Sep 29, 2009 12:05 am
- Just the numbers in order: 7
Re: Authentic JTM 45/100 build diary
One more question - which bias resistor would be recommended when using 490v tap with TAD selected Valve Art KT66 tubes? It's 56k at the moment, but i noticed many of you guys going with 47k there.
-
Roe
- Senior Member
- Posts: 5054
- Joined: Thu Apr 13, 2006 1:36 pm
- Just the numbers in order: 7
- Location: Drontheim. Norwegen
- Contact:
Re: Authentic JTM 45/100 build diary
just try a 56k first, if its too cold you change to a 47k
http://www.myspace.com/20bonesband" onclick="window.open(this.href);return false;
http://www.myspace.com/prostitutes" onclick="window.open(this.href);return false;
Super 100 amps: 1202-119 & 1202-84
JTM45 RS OT JTM50 JMP50 1959/2203/34/39
http://www.myspace.com/prostitutes" onclick="window.open(this.href);return false;
Super 100 amps: 1202-119 & 1202-84
JTM45 RS OT JTM50 JMP50 1959/2203/34/39
-
VintageCharlie
- Senior Member
- Posts: 692
- Joined: Tue Sep 29, 2009 12:05 am
- Just the numbers in order: 7
Almost there
Amp is almost complete - hope it's ready in the next couple of days. Forming filter caps will take a bit of time though. Does the 32uF in the preamp have to be formed too - is it formed with the same process as the rest of the filters - with the 2w 100k resistor on the standby switch?
Here's a link to a pic:
http://i802.photobucket.com/albums/yy30 ... /45100.jpg" onclick="window.open(this.href);return false;
Here's a link to a pic:
http://i802.photobucket.com/albums/yy30 ... /45100.jpg" onclick="window.open(this.href);return false;
Last edited by VintageCharlie on Sat Aug 27, 2011 6:07 am, edited 1 time in total.
-
shakti
- Senior Member
- Posts: 2053
- Joined: Tue Apr 05, 2005 9:06 am
- Just the numbers in order: 7
- Location: Ramnes, Norway
Re: Authentic JTM 45/100 build diary
Looks great! You must be really excited!
The preamp filter cap will be formed along with the other caps in the same process.
The preamp filter cap will be formed along with the other caps in the same process.
JTM45 RS OT, 1973 18W, JTM45/100, JTM50, JMP50 1986, JMP100 "West Coast", AC15, AC30, BF Super Reverb, Boogie Mk 1, Hiwatt CP103, DR103
-
VintageCharlie
- Senior Member
- Posts: 692
- Joined: Tue Sep 29, 2009 12:05 am
- Just the numbers in order: 7
Re: Authentic JTM 45/100 build diary
Yeah, i am - can't wait to test drive it. I got my 4x12 basketweave set up with 2x g12h30's with their original 75hz pulsonic cones (at the moment it's sort of a "ported cab") and i will put 2x g12h 75hz recones in there soon. I tested my 18w through these speakers and it's the first time i really liked the tone of that little bugger - can't imagine how glorious the 45/100 will sound through them.
Guys, please let me know if you think something should be improved or if you see any potential issues - any advice would be greatly appreciated!
Guys, please let me know if you think something should be improved or if you see any potential issues - any advice would be greatly appreciated!
-
JimiJames

- Senior Member
- Posts: 3550
- Joined: Fri Dec 23, 2005 6:32 pm
- Just the numbers in order: 13492
- Location: Chicago
- Contact:
Re: Authentic JTM 45/100 build diary
Whatta' ya, a funny guy? I don't know about the player but, it's gonna' sound as good as it looks.VintageCharlie wrote:...Guys, please let me know if you think something should be improved or.......
Get your recording gear ready to post a clip !
-
VintageCharlie
- Senior Member
- Posts: 692
- Joined: Tue Sep 29, 2009 12:05 am
- Just the numbers in order: 7
Re: Authentic JTM 45/100 build diary
Yeah, i have to really get some proper recording gear, a mic is nr.1. on my purchase list now.
Parts-wise this was as close as i could get to the real thing, so i hope it will contribute to the tonal nuances of originals. An original OT is the only important part that might be an upgrade, but that's rather unreasonable for a clone (even if it would be possible to find a 45/100 OT).
-
VintageCharlie
- Senior Member
- Posts: 692
- Joined: Tue Sep 29, 2009 12:05 am
- Just the numbers in order: 7
Re: Authentic JTM 45/100 build diary
One quick and really silly question. Sorry, i still don't get the nfb and various ohm tap thing correctly.
So there are 4 options - attach the violet wire that comes off the 27k nfb resistor to either 4, 8, 16 ohm tap on the impedance selector, or attactch it directly to the output jacks.
If it's directly connected to the output jacks, then the actual tap that the nfb is connected to depends on the selected impedance on the selector, is this correct? If i'd have an 8 ohm cab, i'd set the selector to 8ohm and the nfb would be connected to 8 ohm, with 16 everything would change to 16.
If i got my tech correctly, he says that connecting the nfb on, say the 16ohm tap of the impedance selector, which i suggested, would let me have negative feedback only when i am using the 16ohm tap on the impedance selector - on the other 2 settings negative feedback would be switched off entirely - i'd have negative feedback only in one position. Is this correct so far? (if i'm not mistaken, i have read the opposite on the forum - connecting the nfb resistor to one of the impedance selector tabs will give me a constant nfb setting, no matter how i set the impedance selector - for example, if the nfb resistor is connected to the 16 ohm tap and i have a speaker with 8ohms, i set the selector to 8 ohms, but the negative feedback won't be turned off - it will stay at the 16ohm setting). Which one is correct?
I want the amp to have the stock marshall nfb setting for a 45/100, which, from what i have read on the forum, is the 16ohm tap on the impedance selector (also amp archives mostly shows pics of amps connected this way, with a couple set up with the 8 ohm tap). But i sure wouldn;t want the nfb to be swithced off at either 8ohm or the 16ohm setting.
-
Ted B
- Senior Member
- Posts: 383
- Joined: Tue May 17, 2011 11:27 am
- Just the numbers in order: 7
Re: Authentic JTM 45/100 build diary
Fortunately, this is incorrect. Taking the NFB feed from the 16 ohm tap means that so long as the 16 ohm OT wire is soldered to that 16 ohm tap, the voltage from the OT is present in the NFB circuit, regardless of what tap is being used for the speakers.VintageCharlie wrote: If i got my tech correctly, he says that connecting the nfb on, say the 16ohm tap of the impedance selector, which i suggested, would let me have negative feedback only when i am using the 16ohm tap on the impedance selector - on the other 2 settings negative feedback would be switched off entirely ...
-
VintageCharlie
- Senior Member
- Posts: 692
- Joined: Tue Sep 29, 2009 12:05 am
- Just the numbers in order: 7
Re: Authentic JTM 45/100 build diary
Thanks Ted! I got him wrong. Then the 16ohm tap it is for this amp.