Page 1 of 1

Another pinstripe restoration

Posted: Fri Jul 01, 2016 10:25 am
by shakti
Do i need yet another cab?

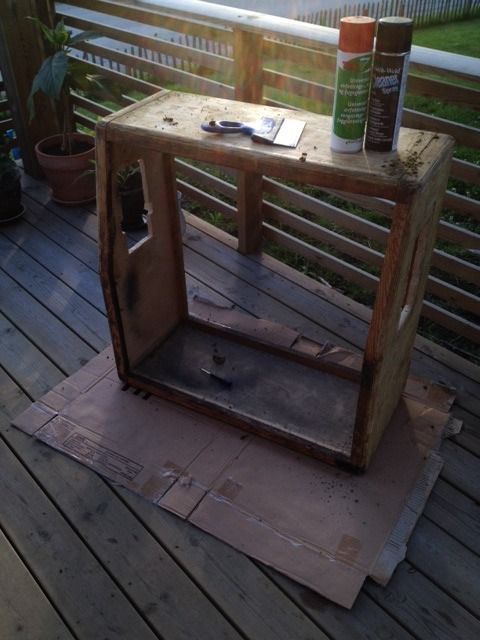
Yes, of course! Especially when it has such potential as this one! Those with a keen eye will soon enough notice the holes and original t-nuts to hold the strap handles on top. So this is a 1966 ex-pinstripe, soon to be restored to its former glory. I have done a restoration of a similar 1967 cab (with narrow flange handles), so I know how "fun" it is, especially the part I am doing now; stripping off the old glue remnants. The two spray cans on top are helping a lot though; spray it on, leave for a minute or two, then have at it with a spatula. The 3M one seems to be the most effective, although the citrus scent *will* make you nauseous eventually. :stars:

Re: Another pinstripe restoration

Posted: Fri Jul 01, 2016 10:27 am
by shakti
Image

Re: Another pinstripe restoration

Posted: Fri Jul 01, 2016 2:52 pm
by neikeel
:popcorn:

What is the 3M stripper?
Also what glue do you use for the new stuff? I have been using Timebond but it can be tricky to get nice thin coats.

Re: Another pinstripe restoration

Posted: Fri Jul 01, 2016 5:00 pm
by shakti
It's called 3M Scotch-Weld Cleaner Spray. It's quite effective. This is the one:
https://www.cromwell.co.uk/shop/cleanin ... MM7220500X

Last time I did this I ordered tolex glue from one of the vendors, think it was Antique Electronic Supply. It was really, really nice to work with so I am doing the same this time. Easy to get a thin nice coat, really easy to work with as you could pull it off and reposition quite easily, yet it really stuck where you put it and didn't slip.

Still can't get the attachments to work, says the board quota has been reached even though they are low resolution images. I always get problems with Photobucket resizing, so if anyone can recommend a good hosting service then feel free.

Re: Another pinstripe restoration

Posted: Sat Jul 02, 2016 3:02 am
by shakti
The original t-nuts on the inside for the leather handles:

Image

Re: Another pinstripe restoration

Posted: Sat Jul 02, 2016 8:24 am
by neikeel
Caution - don't take too long composing a message, or you get redirected through George's firewall and you lose it all.

Shortened message - rout out half thickness all around the added cutouts for 10mm. Make your patches to same size as outer rout and rout corresponding flange on repair patch, it will be much stronger than simple glued inlay (as used on repair below).

Just my 2c.

Re: Another pinstripe restoration

Posted: Sun Jul 03, 2016 5:04 pm
by shakti
Yes, I think I will try to do it that way. I haven't done much of this type of woodworking before, so will have to practice a little bit first. I once had an adapter thingy that would turn my Dremel into a router, hope that will do?