Metro JTM45 Build

Get support and show off your MetroAmp JTM 45 kit builds.

Moderator: VelvetGeorge

Jimy
New Member
Posts: 38
Joined: Sat Dec 31, 2005 1:15 am
Location: San-Ho-Zay, CA

Metro JTM45 Build

Post by Jimy » Tue Feb 21, 2006 12:05 am

I just got started on my Metro JTM45 kit last week and thought I'd document the process. I really enjoy watching other people's amps come together, so I just thought maybe someone might find this interesting. If you're sick to death of "how I built my kit" threads, my apologies in advance.

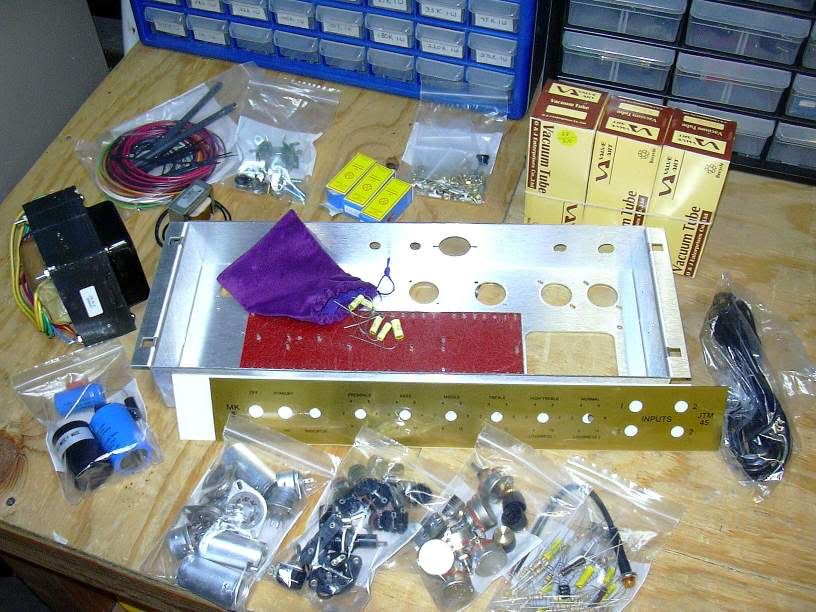
I ordered my kit a couple weeks ago and - due to a shipping snafu - I'm still waiting on the output transformer. But I got started last weekend and I'm going slowly, as I always do. I asked George to upgrade the pots to PEC's and I took advantage of Sozo's discount offer to forum members in order to upgrade the caps. Otherwise, it's just the straight Metro kit.

Image

Day one: hardware. I spent some time this morning installing the PT, the choke, and the tube sockets. I had a day full of personal obligations and things to do, so very little time to work on the amp.

Image

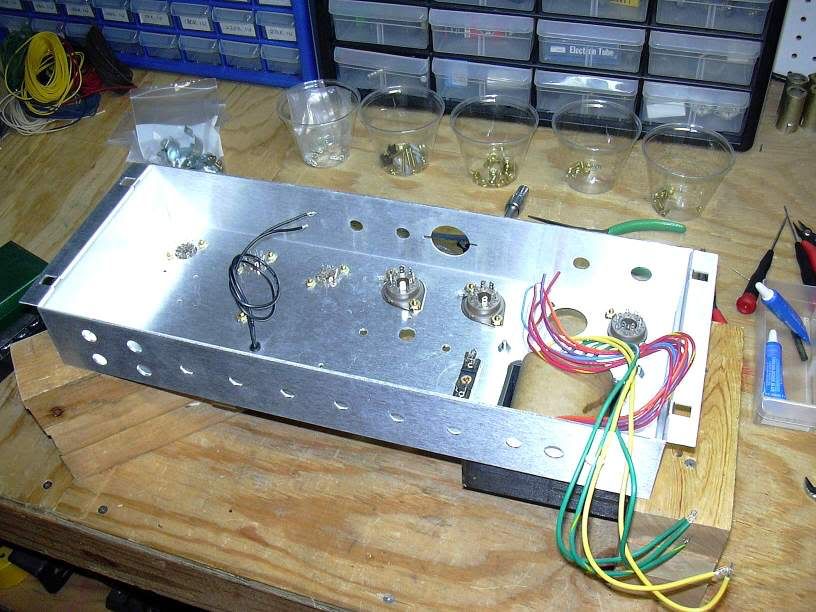
Day two: I quickly realized that I wasn't going be happy working on the amp unless I had some sort of jig or cradle to hold the work solidly in place, so day two began with a little jig building project.

Image

Once everything was secure I was able to go to work wiring up the PT.
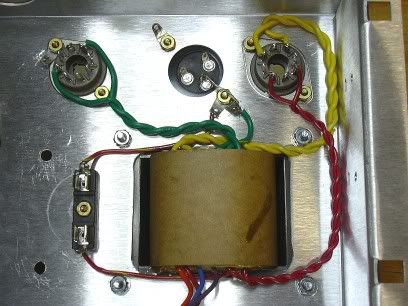
Image

and the heaters...

Image

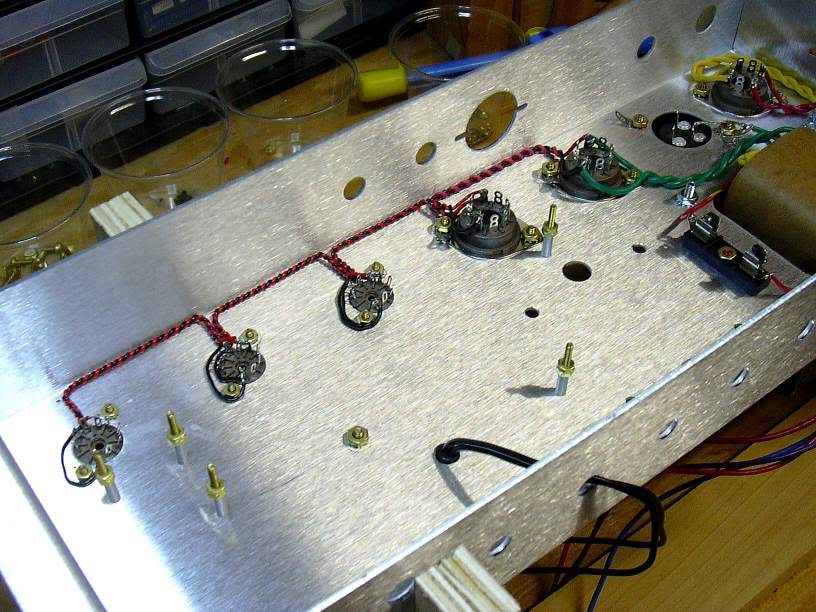
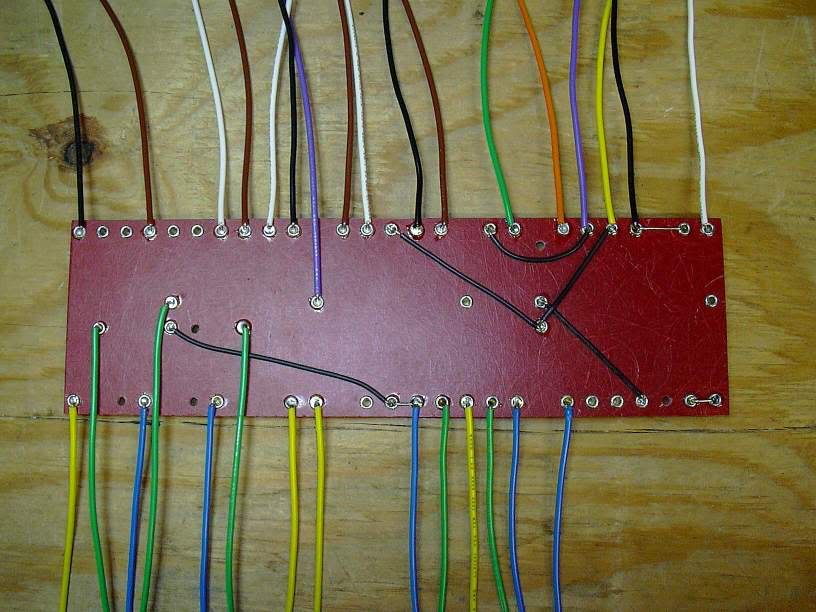
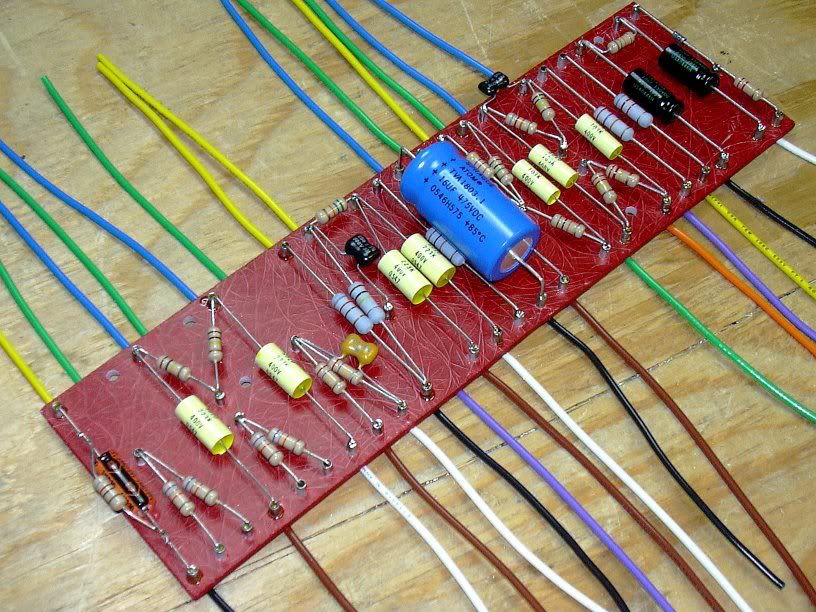
Day four: Since I'm waiting on the output transformer to arrive, I skipped ahead to work on the board. Here's a shot of the under board wiring:

Image

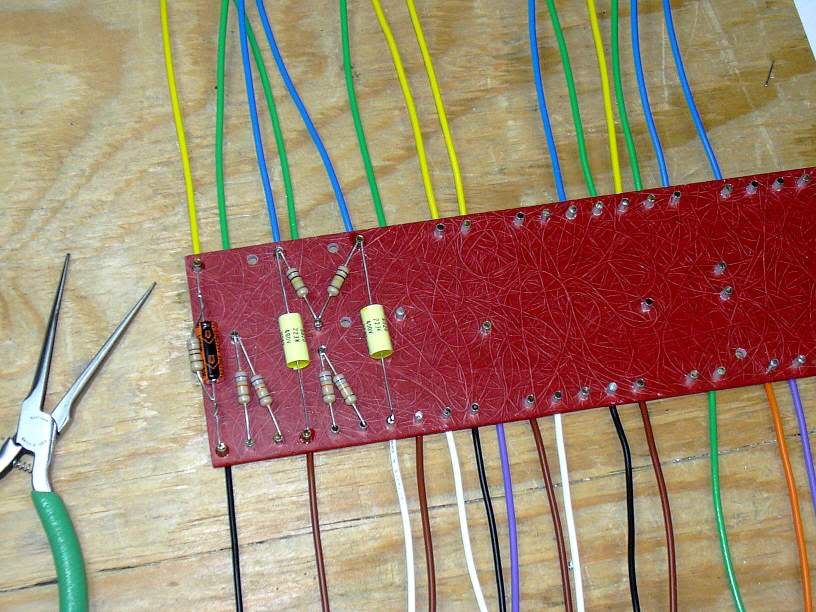
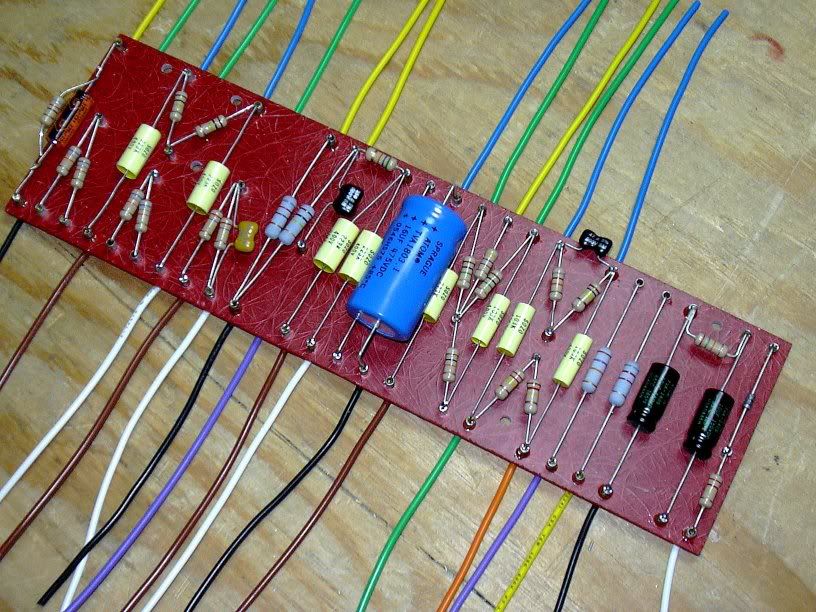
George recommends populating the board after it's installed, but I prefer to do it before the board goes in the chassis. So, in the afternoon I started building the board... always my favorite part of the project.

Image

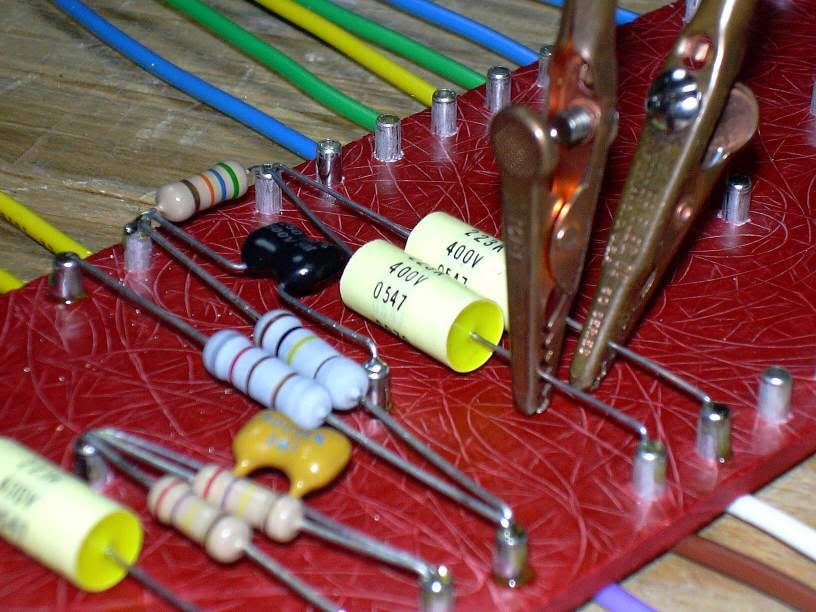
Note the use of heat sinks to protect the (expensive) caps while soldering

Image

Tomorrow will be another busy day for me so not much time for amp building. Hopefully I'll find time to work on the board in the evening. After that, I'm waiting on the arrival of the OT... hopefully by mid-week.

bvmjethead
Senior Member
Posts: 195
Joined: Mon Jan 24, 2005 4:34 pm

Post by bvmjethead » Tue Feb 21, 2006 12:24 am

Looks great so far Jimy!

BashCoder

Post by BashCoder » Tue Feb 21, 2006 1:53 am

Whoohooo! Beautimous, Jimy. How 'bout that solid core heater wire, huh? Sure makes it easier to get a tight twist. I just used it to wire the heaters on my JTM45/100 build yesterday.

The bottom side wiring on your board looks great. And the photos are good quality too, so keep 'em coming!

User avatar
Flames1950
Senior Member
Posts: 9294
Joined: Sun Feb 08, 2004 1:04 am
Location: Waukee, Iowa

Post by Flames1950 » Tue Feb 21, 2006 6:50 am

Ricky Lee, step aside....we have the new king of twisted wire!!!!
Image

Jimy
New Member
Posts: 38
Joined: Sat Dec 31, 2005 1:15 am
Location: San-Ho-Zay, CA

Post by Jimy » Tue Feb 21, 2006 10:15 am

He, he... well I do like a tight twist. :wink: I tried using George's wire but it was too "springy" so I substituted solid core wire (as you so astutely observed BashCoder)... 18 ga between the power tubes, 22 ga for the rest. A couple years ago someone showed me the trick of twisting wire by chucking it into a hand drill. The first amp I built that way came out dead quiet, so it's been my practice ever since.

Billy Batz
Senior Member
Posts: 8566
Joined: Fri Dec 10, 2004 8:49 pm

Post by Billy Batz » Tue Feb 21, 2006 12:43 pm

Flames1950 wrote:Ricky Lee, step aside....we have the new king of twisted wire!!!!
Lol. Thats OCD level twist

User avatar
Ricky Lee
Senior Member
Posts: 813
Joined: Wed May 04, 2005 6:23 pm
Just the numbers in order: 7
Location: Iuka, Mississippi
Contact:

Post by Ricky Lee » Tue Feb 21, 2006 2:23 pm

I concede, he's doing a great job on the twisted pair. But give me a little break, I did use stranded. Again, great job and your right, twisted pair makes for a quieter amp and well worth the extra effort.
May the good Lord take a liking to you!

http://s623.photobucket.com/albums/tt31 ... i%2012xxx/" onclick="window.open(this.href);return false;

User avatar
Freebird
Senior Member
Posts: 337
Joined: Sun Jan 16, 2005 2:36 pm
Just the numbers in order: 13492
Location: Switzerland
Contact:

Post by Freebird » Tue Feb 21, 2006 5:00 pm

Jimy, you did a very nice work on your amp! Congratulations! I also just mounting a JTM45, my first amp building project. Thanks to your useful tips it will make it easier. The idea of a jig and how to twist the wires is brilliant!

Have fun!
Daniel

Jimy
New Member
Posts: 38
Joined: Sat Dec 31, 2005 1:15 am
Location: San-Ho-Zay, CA

Post by Jimy » Tue Feb 21, 2006 11:20 pm

Day Five: I found some time this evening to finish populating the board. Here's a couple pics:

Image

Image

There's some ongoing problems with the OT and I'm kinda stuck until it arrives, so no more amp building for the next few days.

User avatar
Bad Kitty
Senior Member
Posts: 820
Joined: Mon Feb 13, 2006 11:49 pm
Location: St. Helens, OR

Post by Bad Kitty » Wed Feb 22, 2006 12:30 am

I love the nice straight leads. I ordered my board today and now I'm really stoked. Now I have to redo my heater wires too.
Never settle for an amp thats smaller then you are.

bvmjethead
Senior Member
Posts: 195
Joined: Mon Jan 24, 2005 4:34 pm

Post by bvmjethead » Wed Feb 22, 2006 1:31 am

It's so nice to have the resource of this forum at hand.

With pictures the great instructions from George and all the great advice here on the forum how can you possible do a bad job on these kits?

Having said that, GOD....I hope my board will look that nice.....


Jimy is that board completely stock?

NitroLiq
Senior Member
Posts: 1566
Joined: Thu Aug 11, 2005 11:58 am
Location: NYC

Post by NitroLiq » Wed Feb 22, 2006 10:19 am

bvmjethead wrote:Having said that, GOD....I hope my board will look that nice...
Just pick up a couple of lead bender tools - one for smaller and one for larger components...perfect right angles every time.

shakti
Senior Member
Posts: 2053
Joined: Tue Apr 05, 2005 9:06 am
Just the numbers in order: 7
Location: Ramnes, Norway

Post by shakti » Wed Feb 22, 2006 1:48 pm

One thing on your borad looks funky...usually the .1 caps would be larger physically than the 0.022 ones, wouldn't they? Are Sozos different that way?

Other than that; terrific work! It really helps to see how everyone's doing it, I will start my build very soon.

Those lead bender tools you're talking about, what are they actually? I don't think I've ever seen anything like that...

Also, where did you get the solid core wire for the heaters? Sounds like a good idea.

Billy Batz
Senior Member
Posts: 8566
Joined: Fri Dec 10, 2004 8:49 pm

Post by Billy Batz » Wed Feb 22, 2006 1:51 pm

If they say 103k on them then I have some bad news for you. They should say 104k. They look an aweful lot like .01u's to me. Unless thats what you wanted?

User avatar
Ricky Lee
Senior Member
Posts: 813
Joined: Wed May 04, 2005 6:23 pm
Just the numbers in order: 7
Location: Iuka, Mississippi
Contact:

Post by Ricky Lee » Wed Feb 22, 2006 2:04 pm

Those are historically the wrong value caps if he intended on 104k (.1u). Those are the 103 (.01u) caps he has installed. No biggie though, easily enough to change and good example of having the PTP to make quick changes. 104k (.1u) are larger and will look like this.

http://img92.imageshack.us/img92/6784/pic15rm.jpg
Last edited by Ricky Lee on Wed Feb 22, 2006 2:24 pm, edited 2 times in total.
May the good Lord take a liking to you!

http://s623.photobucket.com/albums/tt31 ... i%2012xxx/" onclick="window.open(this.href);return false;

Post Reply