btw might have to get some advice on handling Mr Collins pinstripe for my latest acquisition
Authentic JTM 45/100 build diary. Clips added.
Moderator: VelvetGeorge
-
neikeel

- Senior Member
- Posts: 7231
- Joined: Tue Dec 06, 2005 8:31 am
- Location: Suffolk, England
Re: Authentic JTM 45/100 build diary
I will await its photographic debut 
btw might have to get some advice on handling Mr Collins pinstripe for my latest acquisition
btw might have to get some advice on handling Mr Collins pinstripe for my latest acquisition
Neil
-
shakti
- Senior Member
- Posts: 2053
- Joined: Tue Apr 05, 2005 9:06 am
- Just the numbers in order: 7
- Location: Ramnes, Norway
Re: Authentic JTM 45/100 build diary
Oh dear, what have you been up to now? 
JTM45 RS OT, 1973 18W, JTM45/100, JTM50, JMP50 1986, JMP100 "West Coast", AC15, AC30, BF Super Reverb, Boogie Mk 1, Hiwatt CP103, DR103
-
neikeel
- Senior Member
- Posts: 7231
- Joined: Tue Dec 06, 2005 8:31 am
- Location: Suffolk, England
Re: Authentic JTM 45/100 build diary
One of these:
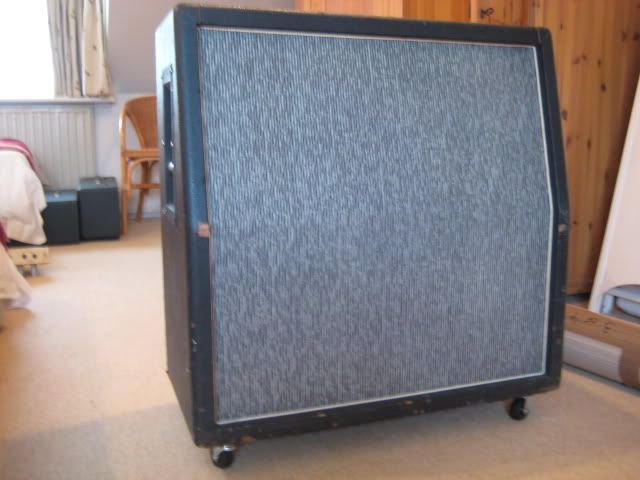
The remains of the pinstripe is still stapled around the baffle. Handles are narrow type. I have two G12H55 25watters with early 68 codes and a couple of later '68 G12H75 30watters to drop in. I suspect that a set of G12M prerolas would be better for use with the 45/100 but although I have two 014 coned ones finding a couple of 003 coned ones for sensible money is proving difficult, so I will bide my time
The remains of the pinstripe is still stapled around the baffle. Handles are narrow type. I have two G12H55 25watters with early 68 codes and a couple of later '68 G12H75 30watters to drop in. I suspect that a set of G12M prerolas would be better for use with the 45/100 but although I have two 014 coned ones finding a couple of 003 coned ones for sensible money is proving difficult, so I will bide my time
Last edited by neikeel on Fri Jul 08, 2011 12:57 pm, edited 1 time in total.
Neil
-
shakti
- Senior Member
- Posts: 2053
- Joined: Tue Apr 05, 2005 9:06 am
- Just the numbers in order: 7
- Location: Ramnes, Norway
Re: Authentic JTM 45/100 build diary
Oh yes....that is what I like to see! That seems to be almost the exact type of cab I also have, except your still has the original tolex. I'm sure you've seen the photo I posted of my restored cab? Mine currently has '70 G12M 55Hz speakers, but may eventually end up with a set of Scumback 20-watt clones (I'm also biding my time in expectation...)
JTM45 RS OT, 1973 18W, JTM45/100, JTM50, JMP50 1986, JMP100 "West Coast", AC15, AC30, BF Super Reverb, Boogie Mk 1, Hiwatt CP103, DR103
-
VintageCharlie

- Senior Member
- Posts: 692
- Joined: Tue Sep 29, 2009 12:05 am
- Just the numbers in order: 7
Re: Authentic JTM 45/100 build diary
Neil, i hope you won't do anything to the tolex - looks great as is - battle-scars and all 
-
neikeel
- Senior Member
- Posts: 7231
- Joined: Tue Dec 06, 2005 8:31 am
- Location: Suffolk, England
Re: Authentic JTM 45/100 build diary
VintageCharlie wrote:Neil, i hope you won't do anything to the tolex - looks great as is - battle-scars and all
Absolutely not, just the new pinstripe. Shame you cannot get pop-in revvos any more so I will be dropping in a set of the Fender ones - they fit nicely after a tiny bit of work and do not look too out of place.
Sorry to hijack the thread Karlis
but if you want more pics:http://s76.photobucket.com/albums/j2/ne ... ipe%20Cab/
Neil
-
VintageCharlie
- Senior Member
- Posts: 692
- Joined: Tue Sep 29, 2009 12:05 am
- Just the numbers in order: 7
Re: Authentic JTM 45/100 build diary
It's always fun to see some great old cabs like this, Neil.
-
VintageCharlie
- Senior Member
- Posts: 692
- Joined: Tue Sep 29, 2009 12:05 am
- Just the numbers in order: 7
cutting SRBP by water jet method?
A lot of time has passed since the last update. Meanwhile i was trying to get my grabs on a couple of NOS parts. The wait was worth it as i got 2 sheets of NOS RS hole board and a few other small bits which will make their way into the build.
I have made my last orders for the build - solder, some tools and last bits will be in my post box in the next 1-2 weeks.
Now i have to cut the RS hole board sheet for the boards. I played around with a few "manual" methods at one corner that had a small blemish anyway and realized that there is probably no chance to do it properly by hand - the outer layer on the bottom chips out quite heavily. Due to that blemish i will have to cut away 2 rows of holes and then the 8x27 and 11x17 boards for the 45/100 will share one "cut". Hence this cut has to be "perfect", as i have to try to loose as little material as possible. Most table saws are out of question, as their "kerf" is too wide - 3-4mm. Laser cutting might melt or scorch the edges or burst up in flames. What i think to opt for now is water jet cutting. I have found some places where i live that do this stuff.
My only concern about water jet cutting is that srbp, especially the old RS type supposedly sucks up water quite a bit. So i'm worried, if water-jet cutting might do some damage to the material due to contact with water, or should it be ok?
I saw that a laser cutting company recommends water-jet cutting for "tufnol", which can designate either srbp or srbf types. Also they seem to cut cardboard and paper by water jet - would the RS srbp or paxolin stuff be ok with water cutting? I'd appreciate any input regarding this very much, as i'm very uneasy about damaging this stuff!
Moe updates will (FINALLY!) come soon!
Kind regards,
VintageCharlie
-
neikeel
- Senior Member
- Posts: 7231
- Joined: Tue Dec 06, 2005 8:31 am
- Location: Suffolk, England
Re: Authentic JTM 45/100 build diary
Don't use water cutting! It will be a disaster 
I used a fine jig saw but cuts are not as neat as the ones Brian H gets - that is why I buy all my boards from him
I used a fine jig saw but cuts are not as neat as the ones Brian H gets - that is why I buy all my boards from him
Neil
-
VintageCharlie
- Senior Member
- Posts: 692
- Joined: Tue Sep 29, 2009 12:05 am
- Just the numbers in order: 7
Re: Authentic JTM 45/100 build diary
A disaster because the SRBP will suck up water and the whole board will be pretty much messed up, become conductive or something?
As for the cut itself, water jet would probably make the best cut, i'd loose just about 0.5mm of the material at the cut. Not much use, if it spoils the whole material though . On the other hand - how do they water-cut cardboard and paper then?
Ok, i will make my way to the hardware store and take a sheet with me - maybe i can find something appropriate.
BrianH recommended me a circular saw with a blade for plastics, small teeth, etc., but any circular blade will take quite a bit of the material away - 3-4mm - and i can't do this because of the one shared edge.
THe worst thing is that i have very little space to experiment on.
I will try to think of a safe method to do this by hand - making some kind of good "guides" for the cut. Maybe doing deep scalpel cuts from top and bottom before sawing, so the outer layer doesn't chip that badly.
So, laser or water jet is a big no-no?
As for the cut itself, water jet would probably make the best cut, i'd loose just about 0.5mm of the material at the cut. Not much use, if it spoils the whole material though
Ok, i will make my way to the hardware store and take a sheet with me - maybe i can find something appropriate.
BrianH recommended me a circular saw with a blade for plastics, small teeth, etc., but any circular blade will take quite a bit of the material away - 3-4mm - and i can't do this because of the one shared edge.
THe worst thing is that i have very little space to experiment on.
I will try to think of a safe method to do this by hand - making some kind of good "guides" for the cut. Maybe doing deep scalpel cuts from top and bottom before sawing, so the outer layer doesn't chip that badly.
So, laser or water jet is a big no-no?
-
neikeel
- Senior Member
- Posts: 7231
- Joined: Tue Dec 06, 2005 8:31 am
- Location: Suffolk, England
Re: Authentic JTM 45/100 build diary
Maybe the pros will tell you otherwise but paxolin wafer + water on electrical board is a recipe for disaster AFAIK.
Neil
-
BrianH

- Senior Member
- Posts: 912
- Joined: Thu Apr 07, 2005 1:14 pm
- Location: New Jersey
Re: Authentic JTM 45/100 build diary
How about an old fashioned miter saw? I'm talking a real saw held in place with a guide. I did a couple boards like that a long while back (my first few boards for home use!). Even that is tough because one slip and you've scratched/gouged your material.
-
Xplorer

- Senior Member
- Posts: 2480
- Joined: Sun Apr 19, 2009 5:27 pm
- Just the numbers in order: 7
Re: Authentic JTM 45/100 build diary
I don't know what's a miter saw but i think i'll simply use a saw that looks like a metal saw, you know, just a tad thinner, by hand.in a metal or wood or plastic material it'll leave a 1/4 mm line, very straight, without damaging the edges. i'm sure thatit'll be great, with my experience. I've got tow rs boards too to cut ! ; )
and the chassis reproduction is coming ; )
ecc83 longplate 161s serie, 2004 shuegang kt66 ( different from the later productions from what was told to me ) , etc. The only thing i really couldn't get was the original selectors. But i think i'll use some moderns, but placed inside instead of screwed when placed outside of the chassis, what do you think ?
Or if somebody gives me the infos, details and exact dimensions i could probably try to have them made ? It could be cool to have a production of these isn't it ?
You're almost there to start your build ! That's cool ! ; )
-
VintageCharlie
- Senior Member
- Posts: 692
- Joined: Tue Sep 29, 2009 12:05 am
- Just the numbers in order: 7
Re: Authentic JTM 45/100 build diary
Thanks for the tips guys!
for now i think i might end u doing it with a guide (aluminum angles on top and bottom of the sheet, screwed together at the ends and perfectly aligned) - then i can cut a line with a scalpel on the bottom, so the outer layer won't rip out hols and then use a razor saw (a type of backsaw), if i can find one of these somewhere where i live. This type of wsaw would be perfect as i could glide it along the aluminum angle and make a consistent 90 degree cut. That's the best "manual" method i could think of. I'm still looking into more advanced methods that might work - with a thin blade and a kerf that won't rip out holes, but i'd have to find a workshop for that that has the proper equipment.
for now i think i might end u doing it with a guide (aluminum angles on top and bottom of the sheet, screwed together at the ends and perfectly aligned) - then i can cut a line with a scalpel on the bottom, so the outer layer won't rip out hols and then use a razor saw (a type of backsaw), if i can find one of these somewhere where i live. This type of wsaw would be perfect as i could glide it along the aluminum angle and make a consistent 90 degree cut. That's the best "manual" method i could think of. I'm still looking into more advanced methods that might work - with a thin blade and a kerf that won't rip out holes, but i'd have to find a workshop for that that has the proper equipment.
-
Xplorer
- Senior Member
- Posts: 2480
- Joined: Sun Apr 19, 2009 5:27 pm
- Just the numbers in order: 7
Re: Authentic JTM 45/100 build diary
I'd propose to you to wait and let me show you if it goes nicely for me. The guides are a good idea but thz scalpel i don't think so. I did an architecrure model a few days ago, i have a lot of experience with cutting stuffs with a cutter or a scalpel bit the rs board shouldn't be cut by such tool. I'll show you how to let only 1/4 mm in the cutting line, and i'll show you the tool, if you'rr patient.
You could have hard time with a scalpel, and also damage the surface even with a guide.
I planned to use a guide too but this way : the board in a sandwich between two pieces of wood or metal or anything straight and solid enough to resist the little thin saw that can cut metal precisely. And the sandwich would be pressed strongly with a press.
But i'm back from avignon, south of france in a week.