Page 3 of 5
Re: Help with my JTM100 1203-80 layout
Posted: Sat Mar 24, 2012 6:05 am
by neikeel
No it is not.
You must do a diagram with the OT, choke and HT hooked up to the spare turret and the choke to the turret you presently have (4) hooked up to and wire (3) to that point. Then move wire (4) to the board where you have that short red wire at the moment (keep that wire in place as it feeds the PI plates.
When your migraine settles have a look at the schematic and see which wire is which and which tie point for each filter node drops onto the HT line. Then it will be easier and not quite wiring by numbers, in the long run it will make more sense.
Re: Help with my JTM100 1203-80 layout
Posted: Sun Mar 25, 2012 4:37 pm
by Homebelly
neikeel, thaks for your help so far, and so Okay..
Clearer head, and a couple of days away from the challenge.
How is this bad boy..
 Final filter cap hookup
 by
Homebelly, on Flickr
Re: Help with my JTM100 1203-80 layout
Posted: Tue Jan 01, 2013 5:43 pm
by Homebelly
Been a while since i posted, but holiday's and currently being between jobs means i have some time to spend on my JTM45/100.
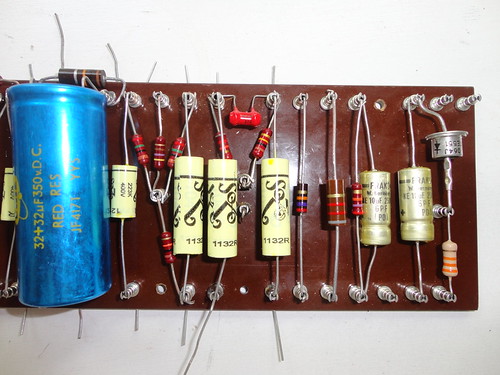
So far i have managed to mock up the preamp/phase inverter/ bias board.
Wiring is a little rough as nothing has been trimmed yet and nothing has been soldered.
As usual, if you see any mistakes please speak up..
Cheers..
 DSC03149
 by
Homebelly, on Flickr
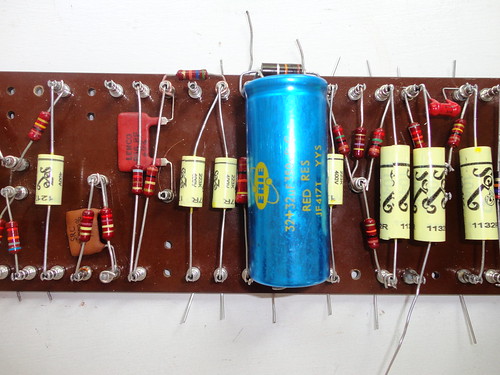
 DSC03148
 by
Homebelly, on Flickr
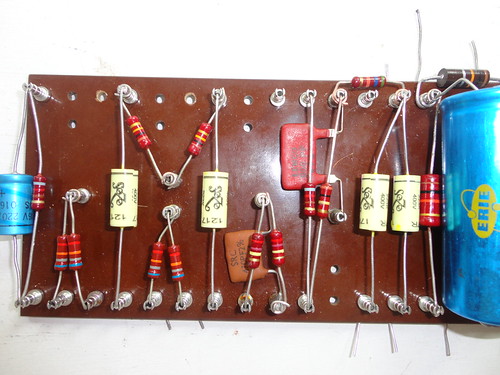
 DSC03147
 by
Homebelly, on Flickr
 DSC03146
 by
Homebelly, on Flickr
Re: Help with my JTM100 1203-80 layout
Posted: Tue Jan 01, 2013 5:53 pm
by julkke
Looking good. Jumpers under the board?
Re: Help with my JTM100 1203-80 layout
Posted: Tue Jan 01, 2013 6:31 pm
by Homebelly
julkke wrote:Looking good. Jumpers under the board?
Yup...
I'll post a picture later..
Re: Help with my JTM100 1203-80 layout
Posted: Tue Jan 01, 2013 7:05 pm
by Homebelly
Mains board.
 DSC03150
 by
Homebelly, on Flickr
Underside of pre-amp board.
 DSC03151
 by
Homebelly, on Flickr
Re: Help with my JTM100 1203-80 layout
Posted: Wed Jan 02, 2013 11:46 pm
by fusionbear
Very Nice!
Re: Help with my JTM100 1203-80 layout
Posted: Thu Jan 03, 2013 9:19 am
by Xplorer
Cool work !
Re: Help with my JTM100 1203-80 layout
Posted: Fri Apr 26, 2013 5:59 pm
by Homebelly
Finally had a chance to sit down and tinker for a while.
Been looking over some of the pictures i have of the late 67 EL34 amp, as well as layouts of KT66 - JTM45/100's and i'm wondering if i need to install a bias trim pot or not?
Re: Help with my JTM100 1203-80 layout
Posted: Sat Apr 27, 2013 1:22 am
by neikeel
Homebelly wrote:Finally had a chance to sit down and tinker for a while.
Been looking over some of the pictures i have of the late 67 EL34 amp, as well as layouts of KT66 - JTM45/100's and i'm wondering if i need to install a bias trim pot or not?
If you plan on using it regularly or use new valves - yes.
If you have a set of burned in Mullards that you can set and forget for a while - no!
IMO of course!
Re: Help with my JTM100 1203-80 layout
Posted: Sat Apr 27, 2013 1:37 am
by Homebelly
cheers...
I'll probably go a head and put one in, i have a spare 25K from an older build..
Re: Help with my JTM100 1203-80 layout
Posted: Sat Apr 27, 2013 7:56 am
by Roe
I changed from BC 33uf to rifa 33uf in mine. more bass and treble and more volume. it sags less and has a little harder tone
Re: Help with my JTM100 1203-80 layout
Posted: Mon Jul 15, 2013 3:10 am
by Homebelly
Finally got a little time between looking after my 21 month old son, going to work, coming home, moving to a new house in a new city and basically living as a grown up man about to hit 50 to sit down and try to figure this out.
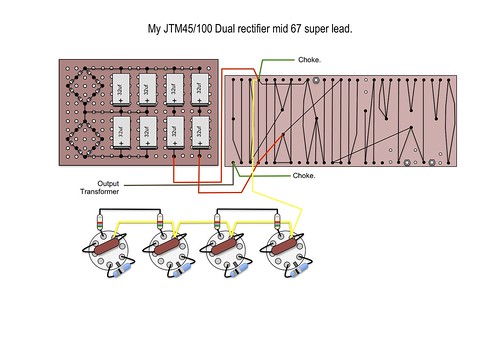
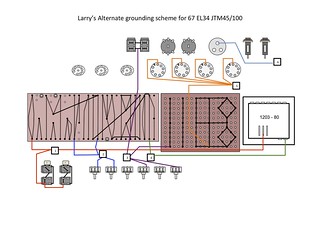
I have read all about every thing there is about the larry grounding scheme, as well as scrutinize every picture i have of how it has been implemented into different amps and i have come up with this..
I would appreciate some one taking a look and pointing me right where i might have got things wrong.
The colouring used is just to help identify the six points and show what parts of each circuit go to each grounding point.
Hopefully this is clear enough. I tried one with all of the components on the boards and it was a hopeless mess and an eye sore to look at. i think this way is a little clearer.

I have also fixed a mistake i made in my earlier diagrams showing extra long rails on the the power board.
 Grounding
 by
Homebelly
Re: Help with my JTM100 1203-80 layout
Posted: Tue Jul 16, 2013 6:30 pm
by Strat78
Thanks for posting that! Looks like we are pretty much living the same lives with a new house, kids and a JTM 45/100 build ramping up.
Re: Help with my JTM100 1203-80 layout
Posted: Wed Jul 17, 2013 1:15 am
by Homebelly
Strat78 wrote:Thanks for posting that! Looks like we are pretty much living the same lives with a new house, kids and a JTM 45/100 build rampping up. Lots of down time ahead for me recovering from an infected knee replacement, actually I,m kind of fucked, but that won't stop me from building.

Don't be too quick to jump in with these pictures there are a few minor mistakes that i need to tidy up.
I'm also hoping roe or kevin jump in and confirm this last one is all good.
I think there needs to be one more connection from the rectifier to the ground at 5..